Some Quick Tips… Starting with a Classic Image of Elizabeth Taylor.
By Gary Bernstein

I made this photograph of Elizabeth Taylor for part of an advertising campaign for Passion Perfume. Celebrities, however, just like the average business executive or the busy housewife have only so much time for photography. So naturally, since the tough part of the session is always in the lighting and setup, I went in close and produced several headshot portraits of Elizabeth at the same time.
Remember – get the hero shot in the camera. For this session, the hero shot was Elizabeth holding the bottle of Elizabeth Taylor’s Passion Perfume. After that, you should do the series of portraits. Get it while they’re in front of the camera. After they leave the studio it’s too late ;)! As for the lighting, it could not be simpler: one small main light (in a small umbrella) to camera left about 4 feet from Elizabeth – creating a 10 o’clock catchlight; and a hair light (again a small light placed 4 feet behind her) that edges the remnant piece of satin I threw on the Denny bench along with some pillows. Shot against my white cove with double background lights keeping the whites white! You can use a white Denny background.
This is called “a high-key” photograph – because the skin is the darkest area of the composition – which makes exposure critical. Does it help the image having a hundred thousand dollars in jewels and Elizabeth Taylor as the subject? Was that a real question??? ;)
(more of the tip below)
Next – Let’s take a look at
A Photo Session for an Actress (or any lady for that matter) using Natural Window Light
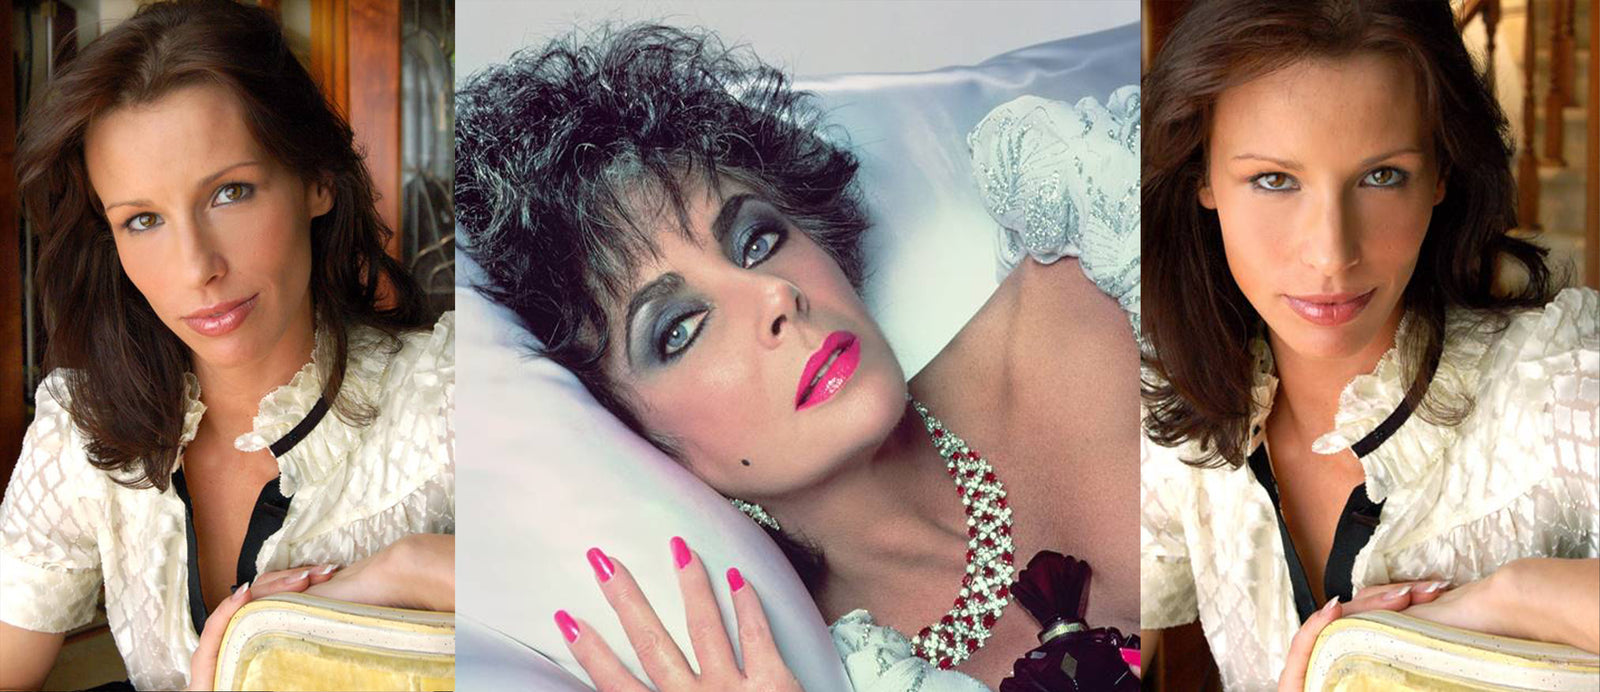
First, the photographs I made (followed by the descriptions):


As a rule, light should come from 30 to 45 degrees above the height of the subject’s eyes creating a catch light in the eye somewhere between 10:00 and 2:00—again, view the surface of the eye as though it were a clock and depending on whether the light is placed camera-left or camera-right. Low light (light coming from below the subject’s eyes) often creates monster light—which is not attractive on most people. The younger the subject, the lower the light can be placed. The lower the angle of the face (the lower the face is dropped), the lower the light can be placed as well.
In this first series, I used only available midday natural light—coming through a window—as the only light source. It was coming from camera-left (the subject’s right). Notice that the subject has a chair and table in front of her to be used as a prop—it is the physical elements that provide that confidence and security factor so important to any photography session.
The light is in fact—an equal balance of—northern light from the sky (which is always so beautiful (and north light is always most desirable)) in combination with reflective light coming off of a cream-colored deck in front of the window.
In reality, reflective light floor surfaces can often be a problem (because of under-lighting particularly in the case of white surfaces) but in this case, the deck works like a large reflector to pop beautiful catch lights into the subject’s pretty eyes and delivers beautiful warm skin tones. If the light surface were not there, I would use a small silver reflector to create a similar balance and effect.
Note that we start with the subject leaning on her hand. “O.K…now, drop the hand, lift your head and turn towards me slightly…” was my direction. That’s how I work with my subjects. I start by telling them to make slow, subtle changes—and that if I’m not telling them what to do (and not talking to them), it is because it looks great!
The result in the first two shots is a 2/3 view of the face, which works far better for women, then for men (specifically if the subject’s eyes remain on the camera). With men, it can sometimes look a bit “shifty” which may not be good for a business portrait; but that same effect for an actor might be considered “edgy,” so the success of a portrait is also determined by the purpose of the portrait. With women, the 2/3 look is always appealing as it is coy and sexy.
This particular lighting angle is called short lighting, because the light is coming from the short (or narrow) side of the face. Notice how it sculpts her cheekbones and the jaw line as the shadow falls on the broad side of her face. It is also a technique I use to narrow wide faces.
The images are made on a small digital camera about 6 MB with a standard focal-length lens (the equivalent of a 50mm lens on a 35mm camera). That’s a little shorter than what I normally use for a shot that is cropped this tight. I tend to like short telephotos for headshots like these because it compresses space (meaning the subject’s features), while throwing the background to a soft blur (when using a small lens opening).
Additionally, the longer lens allows for greater distance between the subject and me, which is often desirable with the inexperienced subject. In this series of photographs, however, the shorter lens truly brings the subject into the viewer—because of the lens curvature and the slight wide-angle distortion (yes, distortion is not always a bad thing).
In the last shot, I asked the subject to turn even more toward the camera, and in doing so, the lighting is split on her face (it’s called—you guessed it—split lighting).
For eyes to look balanced with split lighting, however, I like to create equal catch lights in each eye (those are the highlights and reflections on the surface of the eye). So, with split lighting, the important factor is to be sure that the subject is not turned so far away from the light source that we fail to record a catch light in the shadow eye (in this case, her left eye).
FOR DETAILS ON THESE TECHNIQUES…AND 700 OTHER SESSIONS, TREAT YOURSELF TO ONE OF MY BOOKS!
See you next time, and happy, financially successful shoots to you!

Gary Bernstein











Leave a comment (all fields required)